Subscribe to our blog
SOE Resource Centre
See how Spenda works
with our interactive demo
Setup Guides
Set up
Quotes
Payments
Getting started with Standard Operating Environment
Using SwiftStatement to write invoices to your financials
Using SwiftStatement to match and link Capricorn transactions
How to override a default posting inventory item
How to change Supplier mapping
How to reconcile your payment to Capricorn
How to place transactions on hold
How to remove transaction on hold to match and link
How to manually adjust the posting tax amount
How to dismiss a transaction
Frequently asked questions
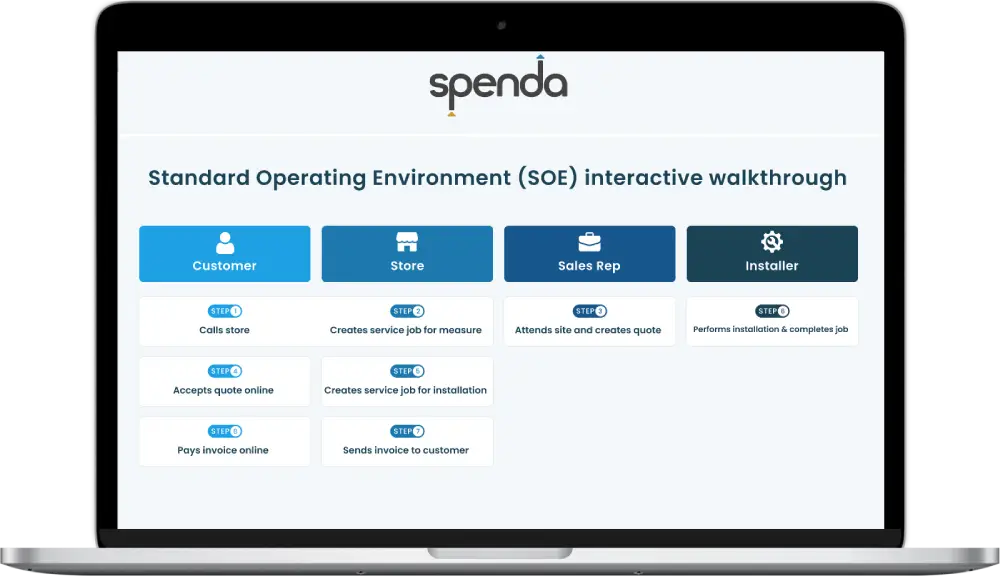
Introduction to SOE
What is SOE?
SOE stands for Standard Operating Environment. In essence, it simplifies your quote-to-pay process. This means more efficient quote management, quicker payments, and smoother job installations.
Who can use this solution?
This solution is ideal for single store operations that utilise Xero and MYOB for their accounting needs.
How do I get set up with SOE for my store?
- Attend the information webinar: Join our informative session to learn all about SOE.
- Follow-up from Spenda: After the webinar, our team will reach out to you.
- Demo account setup: We’ll provide you with a demo account to explore in a test environment.
- Training plan development: We’ll create a tailored training plan to ensure your store is up and running smoothly.
Getting Started (Onboarding)
How do I add my bank account details to invoices?
Bank account details are set up during account setup.
If the details need to be updated, only a Primary or Administrator user can make changes by:
- Going to Settings (top right of the Spenda home screen).
- Clicking ‘Business Details’.
- Updating the bank details under ‘These details will be added to the Accounts Receivable invoice’.
How do I add/ change users?
On your Spenda Home Page, click onto the ‘Settings Sliders’ icon on the top-right of the page , and select Manage Users.
To change a user, simply click on an existing user and edit. Keep in mind that you’ll need to have higher access rights than the account you’re editing.
For example: A Primary user can edit Admin users and below, but a Standard user cannot edit Primary and Admin users.
What are the user profiles and permissions?
Primary user:
- Only one Primary user per account
- Same permissions as an Admin user
- Can prepare and make payments in Accounts Payable
- Can prepare and make payments to Carpet Court
- Can change business details on the account
Recommended for: higher management and business owners
Admin User
- Full access to the system, including all Primary user rights
- Can prepare and make payments in accounts payable
- Can prepare and make payments to Carpet Court
- Can change business details on the account
Recommended for: users managing accounts and financials
Standard User
- Prepare batches in Accounts Payable and make payments to Carpet Court
- Cannot make payments or change business details
- Suitable for specific tasks without full access
Recommended for: staff needing limited permissions
Technician/Installer User
- No access to financial, customer, or business details
- Can use Spenda Jobs App for upcoming jobs and job history
- Cannot access sensitive information
Recommended for: subcontractors or installation personnel needing job-specific access
How do I give a non-subcontractor user access to the Spenda Jobs App?
To enable a non-technician to be on the service calendar and have access to the Spenda Jobs App, go to the manage users settings on the top right of the spenda screen.
Next, select the user you’d like to add and toggle the ‘User Visibility in the Service Management Booking Diary” toggle. This will now show that person in the Service Management module
Quote Management
How do I create a new quote?
Open the Quote Management module, on the right of the screen and press the ‘Create quote’ button.
How do I change the default validity period for quotes?
Open the Quote Management module from the Spenda Web home screen, press ‘settings’, then set a default validity period for quotes.
How do I set or change the default deposit required when a customer accepts a quote?
Once you are inside the Quote Management module, press ‘Settings’, then set a default minimum deposit for quotes.
How do I view or track rejected quotes?
Within the Quote Management module, the ‘Expired/Rejected’ tab displays your history of expired and rejected quotes. Clicking onto the quote will show details regarding the Quote Package.
How do I duplicate an existing quote?
Before a quote has been approved, expired, or rejected, you can click into the quote in the ‘Draft’ or ‘Sent’ tabs and use the ‘Duplicate Package’ option at the bottom-right to duplicate the quote.
Our terms and conditions have been updated — how do I update these on quotes?
Within the Quote Management module, go to ‘Settings’ > ‘Customisation’. There you’ll be able to upload your updated terms and conditions as the default file attached to your quotes.
The shipping and billing addresses are different — how can I separate them on a quote?
When viewing or creating a quote package, click onto the ‘edit’ icon next to the customer’s name on the top-right. A tab will appear under ‘Location Details’.
Next, click onto ‘Add New Address’ to enter a new default billing or shipping address.
What is the difference between internal and external notes on a quote?
Internal notes can be added specifically for team members and/or on-site technicians and are not visible to the external customers.
External notes are specifically for the customer and can be visible to them as an attachment to the quote.
What does ‘Duplicate Package’ mean when managing quote items?
‘Duplicate Package’ allows for you to duplicate a quote for the purpose of sending multiple quotes to the same customer and can be edited individually.
What are quote variants, and how do I use them?
A quote variant is an additional quote you can create in the same quote package to account for alternative options for the customer.
To create a quote variant:
- Go to Quote Management > Create a Quote (or click on an existing quote in draft).
- On the right-hand side under Variants, click onto the ‘+’ icon to add a quote variant. This will add an empty quote to your quote package.
Up to five quote variants can be created in a quote package. You can also ‘Duplicate Package’ on the bottom-left to add more quote variants.
Note: Creating more than a single quote package will send emails/texts to the customer for each one.
How do I attach files or documents to a quote?
When viewing or creating a quote package, click onto the paperclip icon to drop or upload any files or documents to the quote.
How do I customise the line items on a quote, and can I hide item quantities?
When viewing or creating a quote package, you can click onto the fields of a line, allowing you to edit the code, product, and quantity. ‘Add New Line’ will add an additional line item.
Clicking ‘Continue’ shows you a preview of the customer’s quote, and a toggle to ‘Hide Quantity’ is available on the right of the preview.
Can I apply discounts to specific line items or the entire quote?
When viewing or creating a quote package, a quote total section is visible on the bottom right where you can enter in a percentage (%) or dollar ($) amount for a discount.
How do I email a quote directly to a customer from Spenda?
After creating a quote, you’ll see a screen where you can prepare an email to send to the customer. This email will include a PDF copy of the quote and a link for the customer to view and pay.
To resend a quote:
- Go to the Quote Management module from the Spenda home screen.
- Select the quote package you want to resend.
- In the bottom left corner, click ‘Resend Quote’.
- You can update the email wording and add or remove recipients before sending.
How do I set up and manage quote templates for faster quoting?
You can easily duplicate a previously created quote and use it as a template for new customers. To do this:
- Go to the Quote Management module.
- Select the quote you want to use as a template.
- In the bottom left corner, click ‘Duplicate Quote Package’.
This will create a new quote based on the original, allowing you to modify it for any customer quickly and efficiently.
Can I set different price levels or special pricing for customers when creating a quote?
Yes, you can set different price levels or special pricing for customers when creating a quote.
During the quote creation process, you can apply customer-specific pricing, ensuring the quote reflects any agreed-upon discounts or special rates.
These price adjustments can be configured in the system based on customer profiles or specific agreements.
How can I see the history or audit trail of changes made to a quote?
In the Quote Management module, select the quote in question and click on ‘Linked Transactions’. This will show a timeline history of changes made to the quote, including edits, approvals, and any updates throughout the process.
Service Management
What happens after a customer accepts a quote — how do I book a service or installation?
After the customer accepts a quote:
- Go to the Quote Management module and select the Approved Quotes tab, or search for the customer’s job.
- On the bottom right, select ‘Action Quote’ and then ‘Create Service Job’.
- This will bring you to the Service Management module, where you can organise and schedule the installation or service job.
How do I assign a technician, installer, or subcontractor to a job?
In the Service Management module, go to the job details and select the technicians you want to assign to the job from the Technicians dropdown menu. This allows you to allocate the appropriate personnel, such as technicians, installers, or subcontractors, to the job.
How do I create a “Measure and Quote” job before starting a quote?
- Go to the Service Management module on the Spenda home screen.
- Select ‘Create Booking’.
- Search for an existing customer or create a new customer.
- Once the customer is created, fill in the service job details.
- After the measurer has gone on site, go to the service job, select ‘Action Job’, and then ‘Generate Quote’.
- This will bring you to Quote Management, where you can create a new quote package.
How do I set or update appointment times for a service or installation?
To set or update appointment times:
- Go to the Service Management module and open the relevant service job.
- In the job details, find the Appointment Time section.
- Select or update the desired date and time for the service or installation appointment.
- Save the changes, and the updated appointment time will be reflected in the system.
How do I notify customers of scheduled service or installation dates?
- Open Service Management and select the job you want to update. This will bring up the Job Details for that job.
- Click the ‘Action Job’ button on the bottom right of the screen and select ‘Reschedule Job’.
- To reschedule the job without notifying the customer or installer, click on the ‘Book Calendar’ button. After selecting the new time and date, press ‘Save and Close’.
- To notify the customer and installer, press the ‘Confirm & Notify Customer’ button after selecting the new time and date.
This will update the schedule and notify the relevant parties of the new appointment.
How do I track job status — from scheduled to completed?
In the Quote Management module:
- Select the job in question.
- On the top right, click ‘Linked Transactions’.
This will provide a timeline history of the job’s journey, showing the status at each stage and where the job is currently at, from scheduled to completed.
How do I issue an invoice after a service or installation job is completed?
To issue an invoice after a service or installation job is completed, follow these steps:
-
Mark the job as complete
- Ensure that the service or installation job is marked as complete in your system.
-
Access the Service Management module
- Go to the Service Management module in your system once the job is complete.
-
Navigate to the ‘Jobs to Invoice’ tab
- In the Service Management module, locate and click on the “Jobs to Invoice” tab. This tab will display a list of jobs that are marked as complete but haven’t been invoiced yet.
-
Select the customer/s for invoicing
- From the list of completed jobs, select the customers for whom you want to generate and send invoices to.
-
Generate the invoice
- Once you’ve selected the customers, click on the “Generate Invoice” button. This will create the invoices for the selected jobs.
-
Send the invoice
- After generating the invoice, the system will automatically send the customer an email with:
- A pay invoice link that allows them to pay the invoice online.
- A PDF invoice is attached to the email, in case the customer prefers not to pay online. They can also make payment via bank transfer or by calling the store directly.
- After generating the invoice, the system will automatically send the customer an email with:
By following these steps, the system will handle the invoicing process, sending both the online payment link and the PDF copy to the customer. This ensures they can either pay online or download the invoice for their records.
How do I take customer payments on-site or after the service is done?
To record time and labour costs for a service job, follow these steps:
1. Start the job in the Spenda Jobs App
- Technician/Installer action: When the technician starts the job, they should log into the Spenda Jobs App and start the job timer. This begins tracking the time spent on the service job.
2. Pause the job if needed
- If the Technician/Installer needs to take a break or pause the job for any reason, they can pause the timer in the Spenda Jobs App. This ensures that time is accurately recorded, and any downtime won’t be billed.
3. Complete the job and end the timer
- Once the Technician/Installer finishes the job, they should mark the job as complete in the app. This will stop the timer and finalise the tracked labour time for the job.
4. Add additional labour items (if needed)
- If there are additional labour items that need to be discussed (e.g., extra work done during the job or any changes), the Technician/Installer can communicate with the store or management.
- Update the invoice: If additional labour items are agreed upon, they can be added to the invoice before the job is marked as complete. This ensures all labour costs are accounted for.
5. Review and finalise the labour costs
- After the job is marked as complete, the recorded time and labour costs are automatically reflected in the job details.
- If additional labour costs were added, ensure these are included in the final invoice.
Using the Spenda Jobs App
What is the Spenda Jobs app and what does it do?
The Spenda Jobs App is a mobile application designed to help installers, subcontractors, and service technicians manage and track their work efficiently during a job. Key features of the app include:
1. Job Management
- Job assignment: See the specific jobs assigned, including details such as location, customer information, and scheduled dates.
- Job status: Use the job actions to control the state of the job, putting it into Started, Paused, Completed, or marking it as needing to be Rescheduled by the main office.
2. Job Details
- Job description: Access detailed instructions for each task, including required materials and any special considerations.
- Customer information: View customer details such as name, address, and contact information to prepare for the job.
3. Uploading photos and documents
- Photos: Take and upload photos directly from the job site to document work, site conditions, or issues. Photos are automatically added to the job and shared with the internal team.
- Documents: View documents added to the job record by the main office including PDF’s and images
4. Notes and comments
- Add notes: Add internal notes to the job record, including updates, customer feedback, or challenges encountered
- View existing notes: Review notes added by other team members or the customer.
5. Labour cost visibility
- Labour cost information: View the labour cost price for each job to ensure accurate invoicing to the store upon completion.
6. Job completion
- Marking as complete: Mark the job as complete once finished. This updates the system and makes the job eligible for invoicing.
How do stores assign a technician, installer, or subcontractor to a job and app?
In the Service Management module, go to the job details and select the technicians you want to assign to the job from the Technicians dropdown menu. This allows you to allocate the appropriate personnel, such as technicians, installers, or subcontractors, to the job.
How does the assigned technician, installer, or subcontractor download and use the app?
For Android phones, users need to scan the QR code or search for ‘Spenda Jobs’ in the GooglePlay Store and follow the on-screen app installation instructions.


For iPhone users, users need to scan the QR code or search for ‘Spenda Jobs’ in the App Store and follow the on-screen app installation instructions. .


A comprehensive ‘how-to’ guide to send to technicians, installers or subcontractors can be found HERE
Payments
How can my customers pay their invoices?
Once customers receive a payment link via email or SMS, they have several options to complete their payment: they can enter their card details online, make a bank transfer, or call the store directly to process the payment.
What payment methods are available to our customers?
Your customers can make payments using the following methods:
- Visa and Mastercard (Credit and Debit)
- Amex
- ApplePay
- GooglePay
- PayTo (coming soon)
What are the transaction fees involved?
Carpet Court SOE members receive special pricing as below:
| Card type | Fees (excl GST) |
|---|---|
| Domestic Mastercard & Visa Credit | 1% + $0.30 |
| Domestic Mastercard & Visa Debit | 0.7% + $0.30 |
| Amex | 1.7% + $0.30 |
| International | Not accepted |
Apple Pay and Google Pay transactions are charged at the rate for the underlying card.
You can choose to surcharge this cost to the customer or absorb it as a business expense.
How long does it take for funds to reach my bank account after a customer makes a payment?
Typically, transactions will settle into your nominated bank account within three business days.
For example: If customers make payment on a Saturday, you will receive the funds by Wednesday.
Get in touch with Spenda